
Seven ways to get more performance from your website
26 Sep 2021, by Slade Baylis
Showing up late to a first date with someone who could be the love of your life won’t do you any favours. Neither will keeping a potential new employer waiting for an interview for your dream job. In both these scenarios quick judgements are made about you by the way you present yourself and the respect you show to others. This is why it's important to make sure you make a good first impression. The same is true for your website when someone Googles your business.
It’s not just enough to make sure your website looks professional and communicates what your company is about, you also need to make sure it’s quick enough to not frustrate visitors. The last thing you want is someone to be thinking that you haven’t put enough care into your IT. If they can’t navigate your website easily, it shows a lack of concern for their time and these visitors may extrapolate and use this as their sole yard-stick to measure the rest of your business capability.
This is why we’ve put together this high-level overview of the concepts that you should be aware of when optimising your website. With a faster website, users will instead be able to focus on your unique offering and why they should choose to do business with you. It won’t go too in-depth into how to implement these changes, but it will point you in the right direction to know where you should look first.
1. CSS & JavaScript – Combining and compressing files
When looking to optimise a website, there are a few key factors to take into consideration. Any time a visitor comes to a website, they need to download files from your web hosting server. Things like images, fonts, and CSS style sheets all contribute in a small way to the overall website load time. As that’s the case, looking to reduce either the size or number of these files can help speed up a website. But where should you first look when trying to do that? Well, you should first take a look at your CSS and JS files.
First we’ll need to explain what each of those are. A simple explanation of CSS (Cascading Style Sheets) files is that they control how your website is displayed. They control the background colour for the website, what fonts are used, and even where different elements appear on a page. With JS (JavaScript) files however, they control how the different interactive parts of your website behave. This can include simple image sliders, validation rules on what data can be entered into a contact form, or animations built to catch a visitor’s eye.
On modern websites often there are many different bits of software in use, all of which come with their own styling and interactive elements. Due to that, each addon or plugin comes with a variety of CSS files and JS files that they add into a website. What that means is that every time you add more features into your website, more files end up needing to be downloaded to view your website. With that, you can start to see how these can add up and slow down a website substantially.
One of the ways of combatting this is to look at combining your CSS and JS files together. Doing this reduces the overall number of requests per visit, meaning that visitors don’t need to request or download as many files. It should be noted that care should be taken when combining CSS and JS files, as the order in which both are loaded can affect how they behave. Due to this, it is important to make sure that rigorous testing of your website and its functionality is performed after implementing it.
The number of requests is only one aspect to look into though, as the overall size of each file also plays a large part in website load time. In order to reduce the size of each file you can use a method called compression. Compression, when talking about computer data, is a process used to reduce the overall size of a file by re-encoding the data to remove redundant copies of information.
As an example, let’s look at the following sentence:
“Give a man a fish, and you feed him for a day. Teach a man to fish, and you feed him for a lifetime.”
In that sentence you can see that certain words are repeated throughout. The word “a” is repeated five times, and other key words like “man”, “fish”, “and”, “you”, “feed”, “him”, and “for” are all repeated twice. That’s a lot of extra data that has to be sent to the user! Through the use of compression, instead of repeating that information unnecessarily, methods are used to reduce the amount of duplicates that are stored.
As CSS and JS files are just code that is stored in text format, the information can be quite efficiently compressed, and so significantly shrink those files down in size. This is why it’s recommended to implement some form of compression on your CSS & JS files, even if you don’t combine them first.
Implementing compression is getting easier and easier to do, as most caching plugins for Content Management Systems (CMS) like WordPress offer it as a feature that only takes a single click to enable.
2. Server-Side Caching – Storing dynamically generated data as HTML
If you’ve looked into website optimisation before, “caching” is probably a term that you’ve come across. There are several different types of caching though, so first we’re going to discuss server-side caching.
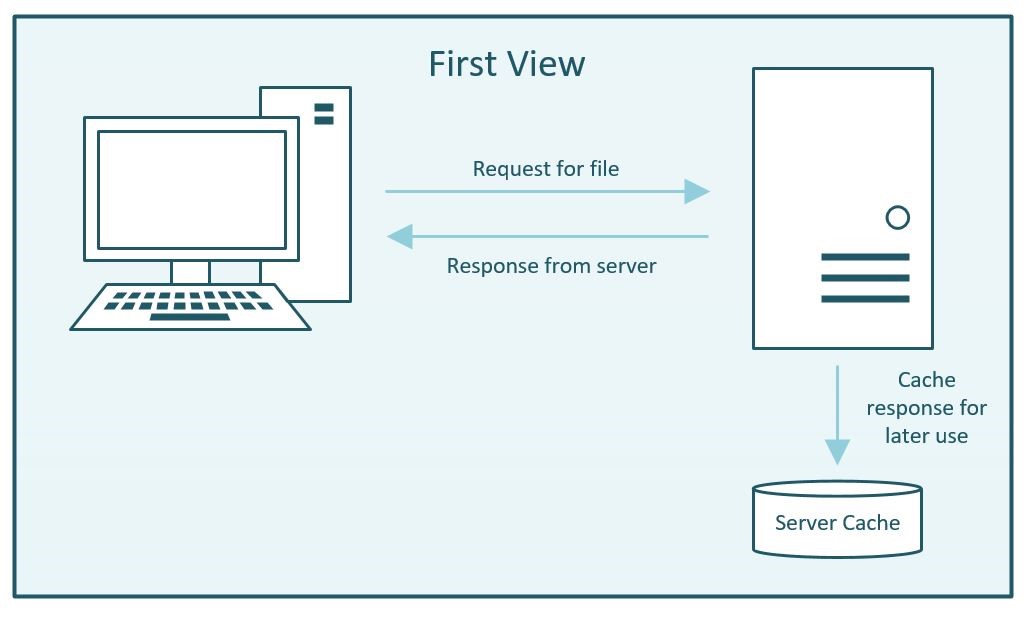
The most common type of server-side caching is called “Page Caching”. To understand what that means we first have to explain how a page is loaded when a visitor comes to a website. When a visitor goes to a page on a website, the server receives that request and then needs to run the code on the website. That used to be simple and just require running a few lines of code, but nowadays it’s often much more complex, requiring lots of code to be run and information to be loaded out of databases. The more complicated the code, or the more information that is needed from the database, the slower the response from the server.
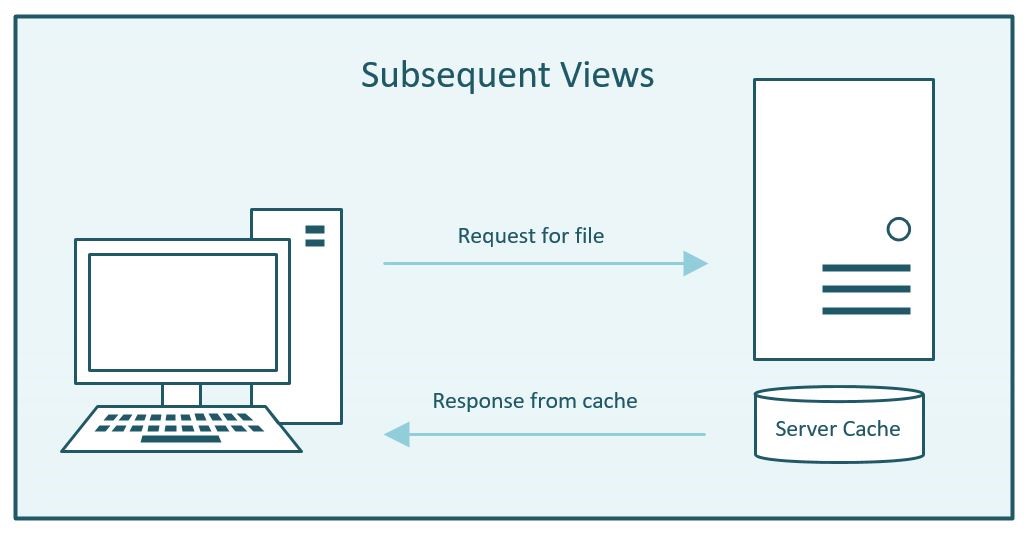
This is where “page caching” can be used to help solve the issue. Using page caching the first time that the data is needed, it is loaded as per normal taking just as long as it regularly does. After that though, the server takes note of the results that it got back and stores them instead. When another visitor comes along to view the page, instead of running the code again and getting information from the database, it will instead just hand them the previous results. As you can see, that will not only dramatically speed up the response, but it will also make your website more resilient to larger amounts of traffic.
Though, nothing in life is as simple as it seems, and there is one thing to be aware of when implementing caching. It sounds fairly obvious, but it is easy to miss, that any element that needs to be dynamic must be exempted from your caching. For example, if you have a shopping cart on your website, then you definitely don’t want to have that cached and shown to different users who come to the website! The same is true for parts of your website that are unique for each person, such as pages that show user information that they’ve entered previously. As such, it is important to review your specific website to make sure that anything that shouldn’t be cached is exempted from any caching that you do implement.
Just like the CSS & JS optimisation mentioned above, this is also much easier through the install of caching plugins. WordPress plugins like LiteSpeed for WordPress, WP Rocket, or classics like WP Super Cache and W3 Total Cache, all have the ability to enable this with a single option.
Note: The “LiteSpeed for WordPress” plugin mentioned above requires you be on a server that runs the premium web-server called LiteSpeed. All Micron21 Web Hosting servers run LiteSpeed as a standard.
3. Client-Side Caching – Helping visitors not having to fetch the same information twice
As server-side caching is caching that is done on the server to avoid fetching information twice, it’s little surprise that “client-side” caching is the same, but on a visitor’s computer. Client-side caching (sometimes called browser caching) is the process of an internet browser storing information received from a server locally on a computer. By doing that, the next time it needs that information it doesn’t need to send another request and instead can just use the saved copy. Not only does it save on bandwidth, but it also makes the website much quicker after the first time you visit it. You’ve probably noticed it yourself without realising it when you’ve gone to a website which takes quite a while to load, and then for it to be much quicker once that first page has loaded.
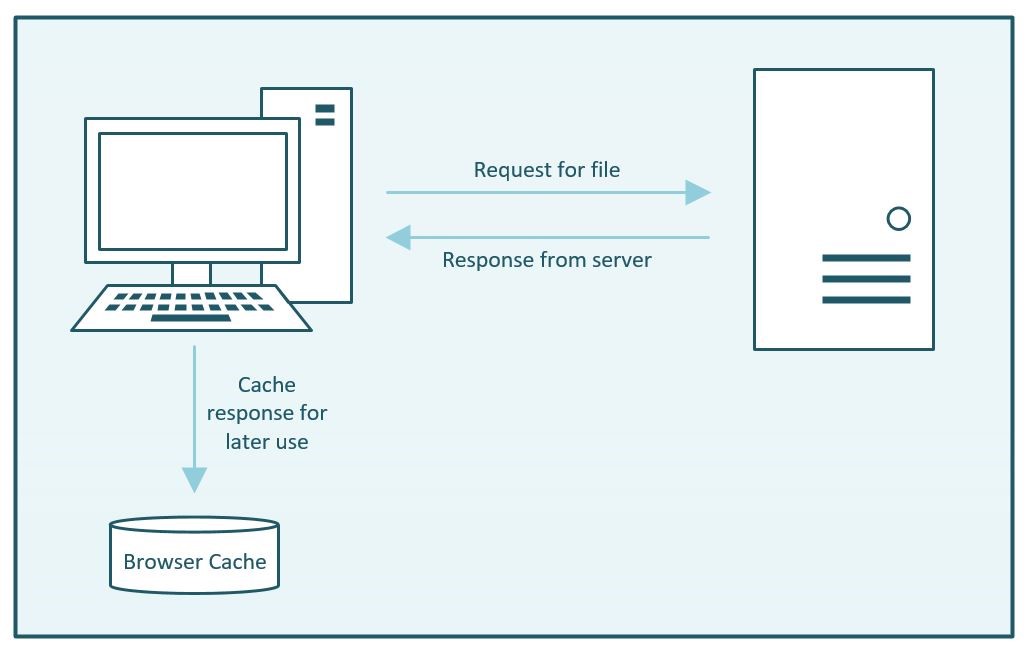
So the next question becomes “How can you leverage this to speed up your website?”. That’s a good question, as browsers by default do a lot of this themselves as standard practice. However, we can still improve this slightly by telling browsers how to cache the files that we give them. This is achieved by setting the “headers” of the website responses, and sending information to browsers so that they can know:
- How long to cache the content for;
- The last time a file was modified, so that they can know if they need to download it again; and
- What files should and shouldn’t be cached.
Sending this information, along with a server response, allows browsers to cache content longer than they would usually, or only fetch content when they need to. By doing that, we lessen the number of requests and amount of information they need to download, which as mentioned, speeds up the overall load time.
Caching plugins can help get this setup, however, you can also manually configure browser caching manually if you aren’t using a CMS. If you would like to set these settings manually, it’s best to search for instructions on how to set that up on the type of web-server that is being used on your server (Apache, Nginx, etc).
4. Image Optimisation – Resizing and compressing images
With large files often being the culprit behind a slow website, it’s no surprise that images/photos come into the conversation when looking at ways to speed websites up. Due to uncompressed images easily being able to be multiple megabytes in size, even a single unoptimised image has the potential to drastically slow down a website. There are two factors to keep in mind when looking into this. The first is the resolution of the image compared to how it’s actually displayed on the website. The second is how compressed the image is and so needing to strike that balance between visual fidelity and website speed.
One of the most common issues with images on a website is that an image is uploaded that is much larger than the size it’s actually being displayed at. It’s not obvious unless you’ve worked with websites before, but you can actually take an image that’s very large (so large that it’s big enough for use on a billboard!) and then have it displayed much smaller on a website. The problem with this is that even if the image is shown at the size of a postage stamp, if the actual image itself is a large multi megabyte file, then it will still slow down a website exactly the same.
Fixing this issue though is very straight forward - you just need to know what the height and width of the image will be when it’s displayed on the website. Once you know this, you can use image editing software (such as Photoshop or GIMP) to resize the image and save a new “web version”. This new web version of the image can then be uploaded to replace the original copy. The image quality will remain the same for visitors, but the amount of data that they’ll need to download will be significantly cut down. As a result, the overall website will also become quicker.
Resizing images isn’t the only way to reduce their size on disk though. Another way is through the use of compression. Just like we mentioned earlier when discussing CSS and JS, data compression is a process used to save disk space by removing duplicate/redundant information that’s stored. When it comes to images specifically though, we need to discuss the differences between “lossy” and “lossless” compression.
When compressing something, you can choose to do so in a “lossless” way or in a “lossy” way. When using lossless compression, the information is compressed but only to a level where all of the data can be preserved in its original quality. However, files can be even further compressed to save on more disk space through the use of lossy compression. As the name “lossy” suggests, this further compression comes at the cost of quality, which is lost during the compression process. Depending on how far this is taken, it can range from being hardly noticeable right through to introducing “compression artifacts”.
To help demonstrate this, here are several different versions of the same image that we’ve saved at various quality levels. The lower the quality, the higher amounts of compression were used to reduce the image size.
No compression – 434 KB

70% Quality – 107 KB

40% Quality – 74 KB

15% Quality – 29 KB

As you can see, whilst a little compression can help reduce the disk size and is hardly noticeable, higher levels of compression quickly start showing ugly artifacts as more and more data from the image is lost. This is why image compression is a balance between the quality you would like the image to display at and the impact that image has on overall website performance.
5. Database Query Optimisation – Slow queries and how to find them
Whilst caching can be used to avoid websites having to repeatedly look up the same information from a database, sometimes it’s not ideal and data lookups need to be completed each time. This is usually the case when you want to have the most up-to-date data available rather than a cached copy. An example of this is when looking up a list of recently purchased items on an ecommerce website. In cases like this, to speed up the lookup of that information, will mean making sure queries against the database are optimised. We’re not going to go in-depth about how to best structure database queries in this article, however, we’re going to help you find out if there are slow queries on your website that you should bring to the attention of a web developer to have fixed.
This first option will require that you have administrator access to your server - so it’s only going to be possible if you are running your systems on your own Virtual Private Server (VPS) or Virtual Cloud Server (VCS). And the way to find out if there are unoptimised queries on your website, is to enable the “slow query log”. This log is one that will keep track of each database query that is made that takes over a certain amount of time to complete. This doesn’t necessarily mean that it’s unoptimised, it could simply be that it’s a lot of data that it has to look through, but often it can point you in the right direction.
The process for enabling this is different depending on what sort of environment you have on your server, so it’s best to check with your server administrator to get this enabled.
If you are running a WordPress website on a Shared Web Hosting account though, don’t fret, as there are plugins available to help. Two of the most common tools used are Debug Bar (https://wordpress.org/plugins/debug-bar/) and Query Monitor (https://wordpress.org/plugins/query-monitor/). Both of these options can be used to try and track down that pesky database lookup that’s just taking way too long. Once you’ve found them, you can mention them to your web developer and see if there is anything that can be done to speed them up.
6. Website Maintenance – Review the code in use on your website
Another important thing to consider if you are using any modern CMS, are any addons or plugins that you choose to use on your website. Not only is it important to review these from a security perspective, but the quality and number of plugins that are in use can dramatically affect a website’s performance.
We’ll be releasing a post later this month with more details on how to determine plugin quality, though from a performance point of view, there is only one real way to gauge the effect that a plugin will have. The way to do this is to test your website’s performance before and after activating it. Not only can plugins affect the website speed for visitors, but with enough plugins, it can dramatically slow down the administrator dashboard. Having a slow dashboard won’t affect your website visitors, but it will make maintenance painful for you or your staff, costing you time, money, and sanity. If you review your website performance each time you add a plugin, you’ll be able to know exactly how much your website performance was affected by each additional plugin.
However, there are many people who already have a website that is suffering from bad performance with many plugins installed. For those users, the best course of action is to create a copy of your website under a new development web-address and then use that for testing.
Here is the process we recommend for trying to determine how much plugins are affecting your overall website speed:
- Take a copy of the website and load it under a new development sub-domain (for example, dev.domainname.com.au)
- Run a speed test against the development site to set the baseline that you will compare the results against
- Disable all of the plugins that are in use on the website
- Re-test the website and record the results
- Re-enable one of the plugins
- Re-test again and record the results
- Repeat until all plugins are re-enabled
Using the steps above, you will end up with data on how much each plugin is contributing to the overall load time of your website. It could be that a few key plugins were the cause or it could be that each plugin was contributing in a small way. Even well developed and optimised plugins can negatively affect a website’s performance when added up. Once you know this information, then you can make decisions to try and consolidate plugins or look to replace plugins entirely if necessary.
7. Hardware – Make sure you’ve got enough horsepower
In some cases an issue with website speed is not due to a badly optimised website, but rather a website needing more resources. Whether it’s CPU, RAM, or disk I/O, any hosting environment (whether it is a shared hosting plan or your own virtual private server) will only have so much resources available to it. That’s why it’s important to know how much CPU, RAM, and Disk I/O your website needs.
With the Shared Web Hosting accounts that we provide, through the cPanel interface you can access a section called “Resource Usage” that will show graphs of your website’s resource utilisation over time. Using this information enables you to find out how much your website uses with usual traffic and compare it during spikes, such as, marketing events. If these graphs show your usage hitting the resource limits, then it would be time to look at increasing those.
For customers using either our Virtual Private Server or VMware Cloud Server services, resource utilisation metrics are available through the administrator portals for each service, or you can reach out to us to get information on this.
For both our Shared Web Hosting and Virtual Private Server services, we have options available to increase the speed of your website via our “Speed Boost” addons. Depending on your platform, these can either increase the amount of CPU and RAM you have available, give you faster CPU architecture, or allow you to benefit from NVMe SSDs. NVMe SSD drives are some of the fastest available SSDs available on the market today.
First Steps – What you should do first
With all the different aspects of website performance to take into consideration, it can be difficult to know which step to begin with. It’s impossible to improve unless you measure your progress. This is why the most important step when optimising a website is to be able to objectively measure the impact of any changes you make along the way.
There are many different tools available to help you analyse website performance. WebPageTest (https://webpagetest.org), GT Metrics (https://gtmetrix.com/), or PageSpeed Insights (https://developers.google.com/speed/pagespeed/insights/) just being a few. Whichever tool you use though, they will be able to give you a solid point of comparison after you make alterations, so that you can know if the change had a positive impact or a negative one.
This is why even before you start work on optimising a website, we recommend that you run a test on your website to see how it performs.
Any questions about how to speed up your website?
Want us to take a look at your website to see what can be done to speed it up? Reach out to us via email at sales@micron21.com or call us on 1300 769 972 (Option #1) to go over your unique situation.